Amazingly enough, this was my first time doing a tessellation lesson. I am not very good at math, and I find tessellations extremely difficult. However, I decided that this year I was going to challenge myself to teach it. To begin this lesson we look at the artwork of MC Escher. My students are always amazed with his work.
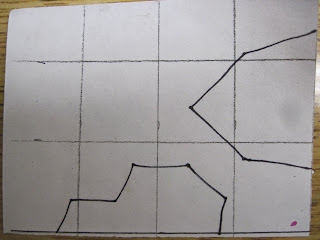
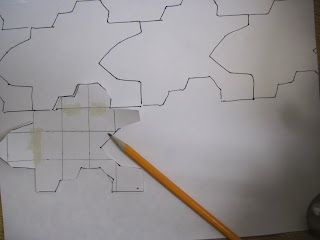
To make tessellations a bit easier on myself and my students, I had them create a stencil. I gave each child a small rectangular piece of paper with a grid on it. I had my student draw one shape along the side and one shape along the bottom. These shapes were then cut out, and placed on the opposite side. If you use the grid, it is much easier to make sure the shape is placed exactly opposite. Once this is in place, use a piece of tape and secure it.
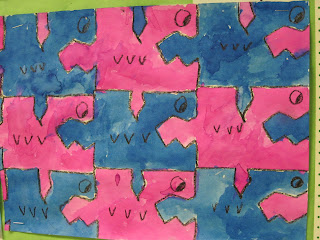
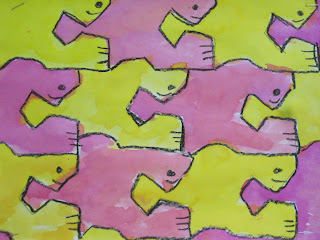
After the stencil is made, I had my students trace it onto their paper. Students then draw details such as eyes, scales, hair, etc.
Students then outline everything with a black crayon. After this, all they need to do is color their tessellations. I had my students use liquid watercolors for this part.

These turned out great, and it really wasn't hard to do. Tessellations were not as difficult as I thought they would be.

 Amazingly enough, this was my first time doing a tessellation lesson. I am not very good at math, and I find tessellations extremely difficult. However, I decided that this year I was going to challenge myself to teach it. To begin this lesson we look at the artwork of MC Escher. My students are always amazed with his work.
 To make tessellations a bit easier on myself and my students, I had them create a stencil. I gave each child a small rectangular piece of paper with a grid on it. I had my student draw one shape along the side and one shape along the bottom. These shapes were then cut out, and placed on the opposite side. If you use the grid, it is much easier to make sure the shape is placed exactly opposite. Once this is in place, use a piece of tape and secure it.
  After the stencil is made, I had my students trace it onto their paper. Students then draw details such as eyes, scales, hair, etc.
  Students then outline everything with a black crayon. After this, all they need to do is color their tessellations. I had my students use liquid watercolors for this part.
 These turned out great, and it really wasn't hard to do. Tessellations were not as difficult as I thought they would be.
I did a similar tessellation project with my 5th graders, but I forgot to photograph the pics so I never posted it. We colored w/markers or colored pencils and they took too long and the kids got a little bored. Your watercolor was a better choice for sure.
ReplyDeleteWe did ours with a square of oaktag. I had the kids cut a shape from one side, corner to corner, and then add it to the opposite side. Then same thing top to bottom. But when we taped them back together, they were allowed to REVERSE one of the two, and it makes the rows face in opposite directions. Some kids reversed them both, and then it got a bit crazy rotating them to fit together but in the end everyone was able to make his pattern work. It was the coloring that wore my kids out....
Thanks so much for posting! I have never even thought about doing tessellations with elementary students, but you really simplified the process. I hope to do this with my students soon!
ReplyDeleteThanks for including the step-by-step directions. This really helped me to see how this works at a level suitable for my students.
ReplyDeleteThanks for this post Holly. I did tessellations today with 9 year olds. The steps you provided were helpful. I have credited you on my blog.
ReplyDelete